Pages

Thursday, 26 September 2013

New Technique: Stick Weaving

Over the last couple of days I finally got round to trying out the weaving sticks I bought when I went to Sandringham Arts and Crafts Fair. To be honest, I had had fairly low expectations about what I would produce, probably because at the time of buying the sticks they seemed pretty puny compared to the big expensive looms I longed for! I've been really pleasantly surprised with what I've made though, and can see a lot more scope for experimentation. 

I found the sticks really simple to use, and although it took a little while to work out how best to hold them, within ten minutes or so I was progressing very speedily! The weaving grew much quicker than I had expected, and it can be quite satisfying to get fast results over the course of just a couple of hours when you're  more used to doing slow, painstaking hand embroidery.


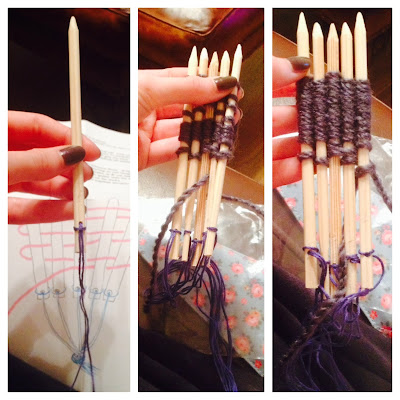
To make the warp threads, you simply loop your thread of choice through the holes in the bottom of the sticks, then tie all the loose ends together to stop the weaving eventually falling off. I used embroidery floss - but only because I didn't have anything else strong enough yet small enough to pass through the holes, it was a bit of a waste of good floss and I intend to find an alternative. Then, starting at the middle stick, it's a simple case of 'up, down, in, out' weaving of your chosen weft - I used some lovely wool with a variegated colour that looked great as the weaving grew.


As I mentioned earlier, the most difficult part at first was finding a way for the sticks to sit comfortably in the hand and not come away from one another, but as the weaving covered them they stayed together much better and I developed a good rhythm. Once the sticks themselves are covered in weaving, you simply pull up the sticks, one by one, through the weaving so that what you have done eases down onto the warp threads.


When the desired length has been reached, you just snip off the warp threads and tie all the loose ends together to hold the weaving in place. It's also important to try and distribute the weaving evenly along the warp threads as it does tend to bunch up, and I did get some uneven results in places. After a few hours, (more accurately, the length of time it took me to watch an episode of Grand Designs and the film Bridesmaids), I built up a number of narrow woven strips, and I love how the colour of the wool blends and changes. 


I have a couple of ideas as to how the strips may be combined to produce a really cosy and uniquely textured cushion cover or similar item, either by stitching them together lengthwise....


... or tabby-weaving them together for something really textured and luxurious.


I've really enjoyed my preliminary attempt at stick weaving and I can see a lot of potential for experimenting with different wool types and thicknesses, other types of weft such as ribbons, and other ways of using the thin strips of weaving to create different textures and items. Random things are occurring to me even as I write this... for example braiding them together for a thick, almost three dimensional scarf, or picking up one of the edges and knitting onto it for a great contrast of texture. Earlier today I tried using some plain, superchunky wool and it gives a much more uniform look than the looser fibres of the variegated one. I don't really like the black but think some earthy tonal shades could look great in a chunkier wool. More experimentation awaits...!


Friday, 20 September 2013

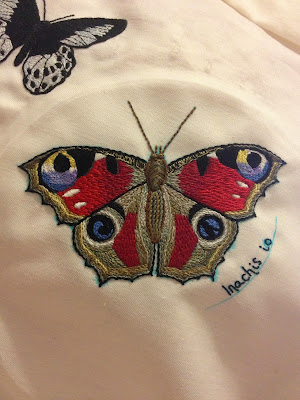
Current Project: Embroidered Butterflies, and the Therapeutics of Stitch

It has now been, much to my dismay, over a month since my last post! Unfortunately it has been a rather difficult period of time as my Mother was in hospital in London (a four-hour door to door journey on public transport for me, with two dogs and a house still to look after back home!) Whilst I have had no time for blogging, I have, however, still managed to spend a few minutes a day on my current hand embroidery project...


I'm working on a collection of different butterflies, and hope to have this as an ongoing side-project to keep coming back to until the whole piece of fabric is covered. The choice of fabric is, however, causing a few problems... when I began the first butterfly it was simply as something to keep me occupied rather than as a project I could see going further, so I just started stitching on the only plain fabric I happened to have - some old curtain lining. It is really a bit thin and tends to mark quite easily, and I'm also experiencing some problems with puckering... I'm hoping that using some stabiliser on subsequent butterflies will help matters! 

For me, however, this project is not so much about a perfect finish or visual results, but rather about the process of stitching itself, doing what I can, when I can. I recently lost my younger sister, and started this project simply as something to do and concentrate on to help cope with very difficult times. I chose to embroider butterflies because they have taken on a very special meaning to me since my sister's passing, for a number of reasons that I won't go into here.

A little research showed me that I am not alone in finding embroidery a way of coping with difficult times. The therapeutics of stitch are recognised as involving meditation, relaxation and distraction - all techniques which are widely taught on pain management courses, and perfect for those experiencing trauma, stress and anxiety. The opportunity to focus the mind and 'block out' feelings of pain, even for a very short time, can have significant effects in providing a renewed feeling of control over otherwise overwhelming situations. The process of making something is also shown to aid self-esteem and combat feelings of social isolation, faced by many people debilitated either physically or mentally. Further studies have even gone so far as to suggest that the rhythmical and repetitive movements of stitching induce a form of meditation that can steady an anxious heartbeat, and enhance the release of serotonin in the body. The beauty of stitch is also that it can be picked up easily for just 10 minutes or so, and put away again with little hassle or fuss - perfect for my situation over the last few weeks of getting just a few minutes a day for myself, amongst a whole lot of stress and upset.

To finish off, I thought I would just share the process of making one of the butterflies. Drawing has never been a strong point for me, so I have relied on using photos to get my embroidery design onto fabric.


Here I have found a picture of a Brimstone butterfly. After seeing many in my garden over the Summer, I just love their gorgeous yellow colour and elegant wing shape, and I thought this side view would show this off and add some variation as the butterflies I have already done have their wings open. 

By drawing over the wing outline of the black and white image with a marker pen, upon turning over the paper you get a good outline of the basic wing shape.


As you can see, the marker pen outline shows clearly through the paper and fabric, allowing it to be easily traced. I use a water erasable fabric pen that I purchased from a local quilting shop. As the name suggests, it allows you to draw anything you like, yet dissolves completely when immersed in water. After tracing the outline of the wing shape - something I didn't trust myself to do accurately enough alone! - I then freehand the rest of the body and any internal patterns within the wings. 


With the design drawn, it is time to start stitching... and yes, don't judge, I am here sat in bed with the pottery scene of 'Ghost' playing in the background... 


The Brimstone butterfly still isn't quite finished as you can see, so it's looking a little messy with all the blue pen still showing round the sides. It shouldn't be too long, however before it is finished and I'm onto the next one! Once all the butterflies are done I will probably work on adding some plants like the one the Brimstone is settling upon in the above photo - watch this space for future updates on how they are coming along!


Sunday, 11 August 2013

Sandringham Craft, Sculpture and Art Fair 2013

This weekend I went to Sandringham Craft, Sculpture and Art Fair. One of the most prestigious craft fairs in the UK, drawing craftsmen, designers and artists from all over the country, this year's fair runs from Friday 9th-Sunday 11th August. It also happens to be just three miles down the road from my house, which is a bonus! 

There was so much to see and do upon arriving at the fair that it was a little overwhelming at first. From ironmongers and wood-turners, chainsaw carvers, potters, jewellery makers, to glass-blowing, oil-painting master classes, spinning and weaving classes, (as well as stranger stands such as one selling hand made goats milk beauty products that stank out the entire area with the scent of sour dairy...) the list and array was endless. Given the state of my fresh graduate overdraft at the moment I had to put a firm limit on the amount of cash I brought with me… a wise decision, otherwise I think I’d have been paying to try my hand at just about everything on offer! I like to think I made financial gains, however, by indulging in the mother of free lunches provided by the endless samples of cheeses, sausage, jams, pickles, fruit liqueurs (!), etc in the amazing food tent…. The whole show was great but I’ll just focus on some of my highlights.

One of the first things I did was attend a 30 minute glass-blowing demonstration by E+M Glass, a husband
and wife duo based on the Welsh-Cheshire border. I had seen such demonstrations on television before, but never in person. I was struck by the massive contrast between the demonstrator, Margaret's, description of the technical difficulties and precariousness of working the glass, yet how effortless and easy she made everything she was doing look. The furnace she was using heated the molten glass to 1100 degrees celsius - hotter than a volcanic eruption. In the process of making a 1920's style fluted perfume bottle, Margaret demonstrated aspects of glass-blowing such as the thumbing method, which involves blowing a small amount of air into the blow-pipe before covering the end of the pipe with the thumb, thereby allowing the trapped air inside to slowly expand due to the heat, in a more controlled manner than lots of blowing alone. Also interesting was being shown how subtle layers of colour were added, by rolling the molten clear
glass in fine granules of coloured glass, that fused and melted onto it in delicate coatings that could later be etched away and texturised in different ways for different effects. The finished bottle's fluted colour design was created with the assistance of Ed, who essentially 'stuck' drizzled strings of different coloured molten glass onto the bottle as it took shape, which were then melted into the bottle and drawn through with a knife to create pattern and movement. The demonstration also included some interesting facts, such as how glass was first discovered by merchant sailors lighting a fire on a beach, that burned so hot that it melted the sand below it. Information on further technical difficulties included the fact that each different colour of glass has different properties concerning its hardness, melting temperature, etc, and hazards regarding the control of temperature. The finished glass pieces can explode if they cool down too quickly, so Ed and Margaret place them in a computerised kiln that begins at a temperature of 480 degrees celsius, before gradually becoming cooler over the course of eight hours or so. 

My two favourite textile-y highlights of the show were a brilliant stall demonstrating traditional machine-knitting techniques, and a whole tent full of different types of traditional weaving. 


Martin Green produces beautiful and delicate knitted shawls and scarves, all made on his collection of original Victorian circular knitting machines- originally invented in order to industrially produce socks- or William Lee-type machines that were first invented in 1589. I just love this type of thing- being able to actually use the very machines and materials of the past to make something that you know is just the same as our ancestors would have possessed. The shawls on display were unbelievably soft and delicate, and I would highly recommend them as a beautiful gift for a new baby. I also found the pricing very reasonable given the beautiful quality, and I was determined to buy something from this stall! The smallest scarf size made on the William Lee machine was £9.95, which I was very tempted by, simply to own such a lovely piece of textile. I decided in the end, however, to go for something that I would actually wear myself - a scarf/snood knitted on the Victorian circular knitting machine. Despite being priced at £4.95 in a bin of 'off-cuts/end bits', it is beautifully soft and delicate, yet still very warm and cosy- certainly not a 'reject' in my eyes! 

My other favourite textile element of the show was a tent devoted to weaving techniques. I was really impressed by the possibilities of tapestry weaving, which made some really detailed images as well as modern geometric designs and imaginatively varied textures.


Perhaps the most painful part of the day was seeing an entire tapestry-weaving kit on sale for £18.50 that I was sadly unable to afford by that point! It is something I would just love to try, and I got chatting to a woman whose friend runs classes relatively near me, so watch this space... It was definitely for my own good that the stall didn't have a card reader machine, as I would have been very tempted by a peg loom as well, which produces lovely pieces of weaving like the above rugs, and that I was assured is very easy to do.


In the end I had to make do with what I could afford with my final £2.50 of the day - some 'weaving sticks' that are essentially a smaller, hand-held version of peg weaving - I will post an update when I've had a go with them! A final feature of the weaving tent were these magnificently textured Wensleydale sheep fleece rugs, and accompanying live demonstration on a traditional loom. 


I've just looked back over all I've written so far and have realised I could probably triple this amount if I carried on going into everything I liked at the show in this way... so I will just be brutal with myself and post a few pictures of my remaining absolute favourites... 


These leather moccasins were just so bright and whimsical, and the most incredibly soft leather I think I've ever felt. They were being made in live demonstrations and I'd never seen something like that in person before. They were created in any colour-way desired - and custom-made shoes for £25 these days is a massive bargain!


This In Stitches jewellery was really clever - made using knitting and crochet techniques, but done with jewellery wire instead of textile. You can see the slender metal knitting needles in the picture below, and jewellery wire with beads threaded onto it, that are then knitted into the design. Whilst the design of the jewellery isn't necessarily something I would wear myself in terms of colours and shapes etc, I thought the technique was really cool, and, as ever, would be something I'd love to try if I can get my hands on some of those special knitting needles..!


Chainsaw wood-carving is a big part of the Craft Fair, as it is home to the 'Sandringham Cup', a sought-after award for which the top 12 UK and European wood-carvers compete. My favourite wood-carved items were this absolutely enormous chair, and these oak leaves that I thought could also possibly serve as chairs. 


My remaining purchases of the day were this little hanging ornament for my Mum, who has an irrational love of decorative chickens (and the Daisy on it was a bonus), and some fat quarters of fabric from a quilting stall, as I am  currently preparing to begin my first quilting project. There were some amazing things on display on the quilting stall, but unfortunately the fabulously crabby 80+ year old woman running it wouldn't allow me to take any pictures, her reason being that I wasn't 'local enough!' She also looked me up and down and informed me wryly that 'quilting isn't for everyone', and let me know that my chosen fabrics didn't match (they weren't supposed to)... but hey-ho, all part of the quirkiness of the day and the world of crafting..! All in all, a great day and I look forward to next year. 


Friday, 9 August 2013

Book Review: 'The Embroidery Stitch Bible', Betty Barnden, (London: Quarto, 2003)

I mentioned a whole load of different stitches in my last post, and I just wanted to quickly share where I learnt quite a lot of them. This is one of the best collections of stitches I have come across, boasting over 200 different ones for fabric, pulled thread work, drawn thread work, smocking, embellishment, insertion stitches, canvas stitches... its examples are truly endless. 

A 'stitch selector' at the beginning of the book groups stitches by type (line, detached, raised, etc) and provides small images of them all to make for easy inspiration and comparison. Then upon turning to the recommended page, there are clear and understandable directions to form the stitch. I had never got on very well with stitch books before, as I tend to be more of a visual learner about such things and need to see them performed in person/ simply go through a lot of trial and error. This was not the case at all with this book, I found it brilliant and it gave me the confidence to experiment more and more. A major project to add to my ever-growing list now that Uni is over would be to try out some canvas work as soon as possible, I've never done any before but have been meaning to ever since seeing the amazing possibilities in here.  

I would recommend this book to those that already embroider and would like to widen their range of stitches/ simply see a lot of possibilities and different ideas, and also for beginners. The book's introduction and 'Working Practice' sections both provide great information concerning sewing technique, how to choose the correct fabrics, properly prepare fabric for embroidery, and prepare a piece of embroidery for mounting and display - for the beginner it is an all-in-one really, and a reliable source of information. One thing I think would make it even better for beginners, however, would be a difficulty rating for each of the stitches. There are so many that it could become a little overwhelming, and inevitably many of the most attractive tend to be the most difficult... a rating system could encourage more step-by-step, manageable experimentation! Other than than, a great book that has definitely widened my own experimentation and confidence. 

Monday, 5 August 2013

Two Contrasting Samplers: Part Two

This second sampler provides a contrast to the first in a few different ways. First of all, it is my own design, based upon a collection of African textile I went to see at the Whitworth Art Gallery in Manchester - no more rigid Victorian flowers... I have always loved African textile because of its brilliant range of techniques, and unique pattern and design. Additionally, whilst Western culture tends to distinguish hierarchically between 'art' and 'craft', textile is historically held in much higher esteem by many African cultures, free of such hierarchical divisions - a cultural attitude I am of course a big fan of! My purpose in making this piece was closer to the earliest function of samplers discussed in a previous post. It was to try out and provide examples of as many different stitches as possible - and I managed to pack a fair few in! The whole process was a lot more free than rigidly following a counted cross-stitch pattern, and I allowed myself to go with the flow and experiment as much as I could, rather than stressing about perfection or how the overall thing would turn out... 


I chose a non-counted linen fabric to embroider on as it echoed some beautiful linens I had seen in the African exhibition. Each section is based upon a close-up or aspect of the distinctive patterns and techniques that inspired me.


The orange sections were inspired by this cloth, which was in fact manufactured in Manchester between 1960-79 using an industrial wax batik technique, to then be sold to a West African market.


Stitches used: split stitch for the diamond, running stitches elsewhere, double-threaded backstitch for the border.


Stitches used: Pekingese stitch for the border, then from the outside in... twisted chain stitch, couching, stem stitch, verticle lines in centre are double knot stitch and the black motifs the brilliantly named 'tete-de-boeuf' stitch. 


The yellow, purple and green sections were inspired by the shapes, patterns and patchwork-esque effect seen in various strip-woven cottons from early twentieth-century Sierra Leone, although I changed the colours quite a lot (due partly to not having the right ones, and partly to make the sections stand out next to the predominantly dark blues of the sections next to them): 


Stitches used: two interlocking rows of threaded running stitch for the border, coral stitch for the shape outlines, filled with different variations of herringbone stitches, and satin stitch. This is probably the section I'm least happy with, I think because I'd created some awkward-to-fill shapes that didn't suit my chosen fillings too well... 


Stitches used: Cable chain stitch for the border, top left filling is basic needleweaving (didn't go too well...), below that is trellis and cross filling with some extra cross stitches, left to right lines are then fly stitch, feather stitch and chevron stitch, then a section of french knots with some sheaf stitches below.


The blue section below is based on this Nigerian, indigo-dyed 'adire' cloth, which uses various resist-techniques to achieve its effect.

This section is one of my favourites, and I did the whole thing on Christmas Day - as I mentioned in my last post, I find looking at my needlework like a visual diary, so looking at this section always reminds me of that day.

Stitches used: Scroll stitch for the outline, then from left to right: shaded brick stitch, pendant couching, different types of blanket stitches overlapping, and another section of shaded brick stitch. 


Finally, the last section is based on this amazing '8 knives' robe, belonging to a late 19th/ early 20th century Hausa Nigerian Chieftan. 


The robe had an amazing three-dimensional design to it, and I loved the heavy white embroidery. As such, I wanted to create something quite textured for this section, and it basically turned out a collection of chain stitches.


Stitches used: border is heavy chain stitch, the white swirls are a raised chain band, with everything else filled in with ordinary chain stitch. 


Phew, so there we have it... two very different samplers in terms of stitches, textures and style, made through very different processes and for different purposes... yet they both fit into the definition of a sampler at various points throughout its history.