Pages

Thursday, 26 September 2013

New Technique: Stick Weaving

Over the last couple of days I finally got round to trying out the weaving sticks I bought when I went to Sandringham Arts and Crafts Fair. To be honest, I had had fairly low expectations about what I would produce, probably because at the time of buying the sticks they seemed pretty puny compared to the big expensive looms I longed for! I've been really pleasantly surprised with what I've made though, and can see a lot more scope for experimentation. 

I found the sticks really simple to use, and although it took a little while to work out how best to hold them, within ten minutes or so I was progressing very speedily! The weaving grew much quicker than I had expected, and it can be quite satisfying to get fast results over the course of just a couple of hours when you're  more used to doing slow, painstaking hand embroidery.
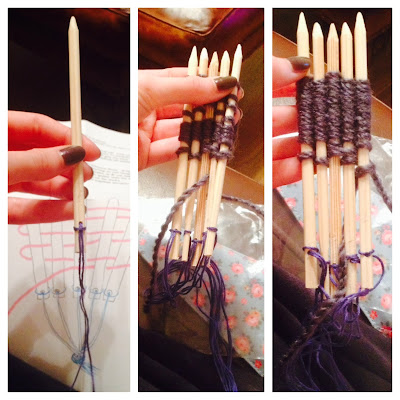


To make the warp threads, you simply loop your thread of choice through the holes in the bottom of the sticks, then tie all the loose ends together to stop the weaving eventually falling off. I used embroidery floss - but only because I didn't have anything else strong enough yet small enough to pass through the holes, it was a bit of a waste of good floss and I intend to find an alternative. Then, starting at the middle stick, it's a simple case of 'up, down, in, out' weaving of your chosen weft - I used some lovely wool with a variegated colour that looked great as the weaving grew.


As I mentioned earlier, the most difficult part at first was finding a way for the sticks to sit comfortably in the hand and not come away from one another, but as the weaving covered them they stayed together much better and I developed a good rhythm. Once the sticks themselves are covered in weaving, you simply pull up the sticks, one by one, through the weaving so that what you have done eases down onto the warp threads.


When the desired length has been reached, you just snip off the warp threads and tie all the loose ends together to hold the weaving in place. It's also important to try and distribute the weaving evenly along the warp threads as it does tend to bunch up, and I did get some uneven results in places. After a few hours, (more accurately, the length of time it took me to watch an episode of Grand Designs and the film Bridesmaids), I built up a number of narrow woven strips, and I love how the colour of the wool blends and changes. 


I have a couple of ideas as to how the strips may be combined to produce a really cosy and uniquely textured cushion cover or similar item, either by stitching them together lengthwise....


... or tabby-weaving them together for something really textured and luxurious.


I've really enjoyed my preliminary attempt at stick weaving and I can see a lot of potential for experimenting with different wool types and thicknesses, other types of weft such as ribbons, and other ways of using the thin strips of weaving to create different textures and items. Random things are occurring to me even as I write this... for example braiding them together for a thick, almost three dimensional scarf, or picking up one of the edges and knitting onto it for a great contrast of texture. Earlier today I tried using some plain, superchunky wool and it gives a much more uniform look than the looser fibres of the variegated one. I don't really like the black but think some earthy tonal shades could look great in a chunkier wool. More experimentation awaits...!


Friday, 20 September 2013

Current Project: Embroidered Butterflies, and the Therapeutics of Stitch

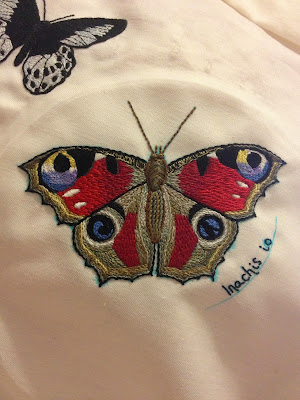
It has now been, much to my dismay, over a month since my last post! Unfortunately it has been a rather difficult period of time as my Mother was in hospital in London (a four-hour door to door journey on public transport for me, with two dogs and a house still to look after back home!) Whilst I have had no time for blogging, I have, however, still managed to spend a few minutes a day on my current hand embroidery project...


I'm working on a collection of different butterflies, and hope to have this as an ongoing side-project to keep coming back to until the whole piece of fabric is covered. The choice of fabric is, however, causing a few problems... when I began the first butterfly it was simply as something to keep me occupied rather than as a project I could see going further, so I just started stitching on the only plain fabric I happened to have - some old curtain lining. It is really a bit thin and tends to mark quite easily, and I'm also experiencing some problems with puckering... I'm hoping that using some stabiliser on subsequent butterflies will help matters! 

For me, however, this project is not so much about a perfect finish or visual results, but rather about the process of stitching itself, doing what I can, when I can. I recently lost my younger sister, and started this project simply as something to do and concentrate on to help cope with very difficult times. I chose to embroider butterflies because they have taken on a very special meaning to me since my sister's passing, for a number of reasons that I won't go into here.

A little research showed me that I am not alone in finding embroidery a way of coping with difficult times. The therapeutics of stitch are recognised as involving meditation, relaxation and distraction - all techniques which are widely taught on pain management courses, and perfect for those experiencing trauma, stress and anxiety. The opportunity to focus the mind and 'block out' feelings of pain, even for a very short time, can have significant effects in providing a renewed feeling of control over otherwise overwhelming situations. The process of making something is also shown to aid self-esteem and combat feelings of social isolation, faced by many people debilitated either physically or mentally. Further studies have even gone so far as to suggest that the rhythmical and repetitive movements of stitching induce a form of meditation that can steady an anxious heartbeat, and enhance the release of serotonin in the body. The beauty of stitch is also that it can be picked up easily for just 10 minutes or so, and put away again with little hassle or fuss - perfect for my situation over the last few weeks of getting just a few minutes a day for myself, amongst a whole lot of stress and upset.

To finish off, I thought I would just share the process of making one of the butterflies. Drawing has never been a strong point for me, so I have relied on using photos to get my embroidery design onto fabric.


Here I have found a picture of a Brimstone butterfly. After seeing many in my garden over the Summer, I just love their gorgeous yellow colour and elegant wing shape, and I thought this side view would show this off and add some variation as the butterflies I have already done have their wings open. 

By drawing over the wing outline of the black and white image with a marker pen, upon turning over the paper you get a good outline of the basic wing shape.


As you can see, the marker pen outline shows clearly through the paper and fabric, allowing it to be easily traced. I use a water erasable fabric pen that I purchased from a local quilting shop. As the name suggests, it allows you to draw anything you like, yet dissolves completely when immersed in water. After tracing the outline of the wing shape - something I didn't trust myself to do accurately enough alone! - I then freehand the rest of the body and any internal patterns within the wings. 


With the design drawn, it is time to start stitching... and yes, don't judge, I am here sat in bed with the pottery scene of 'Ghost' playing in the background... 


The Brimstone butterfly still isn't quite finished as you can see, so it's looking a little messy with all the blue pen still showing round the sides. It shouldn't be too long, however before it is finished and I'm onto the next one! Once all the butterflies are done I will probably work on adding some plants like the one the Brimstone is settling upon in the above photo - watch this space for future updates on how they are coming along!